Pico Weather Station
Exciting news
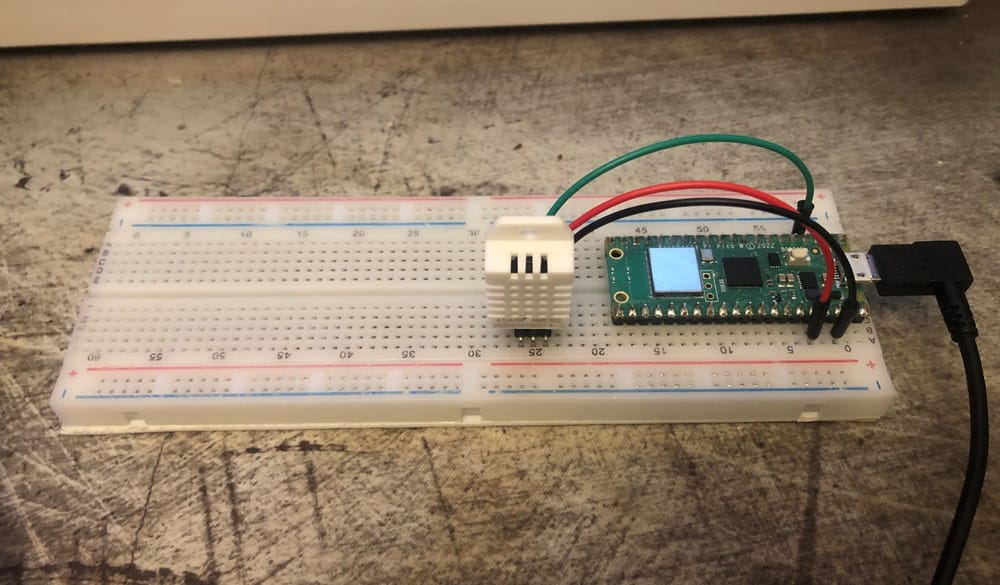
I have been working on the weather station project over the last few days. I have been using a Raspberry Pi Pico as a replacement for one of my other Raspberry Pi's to run the temperature sensors from.
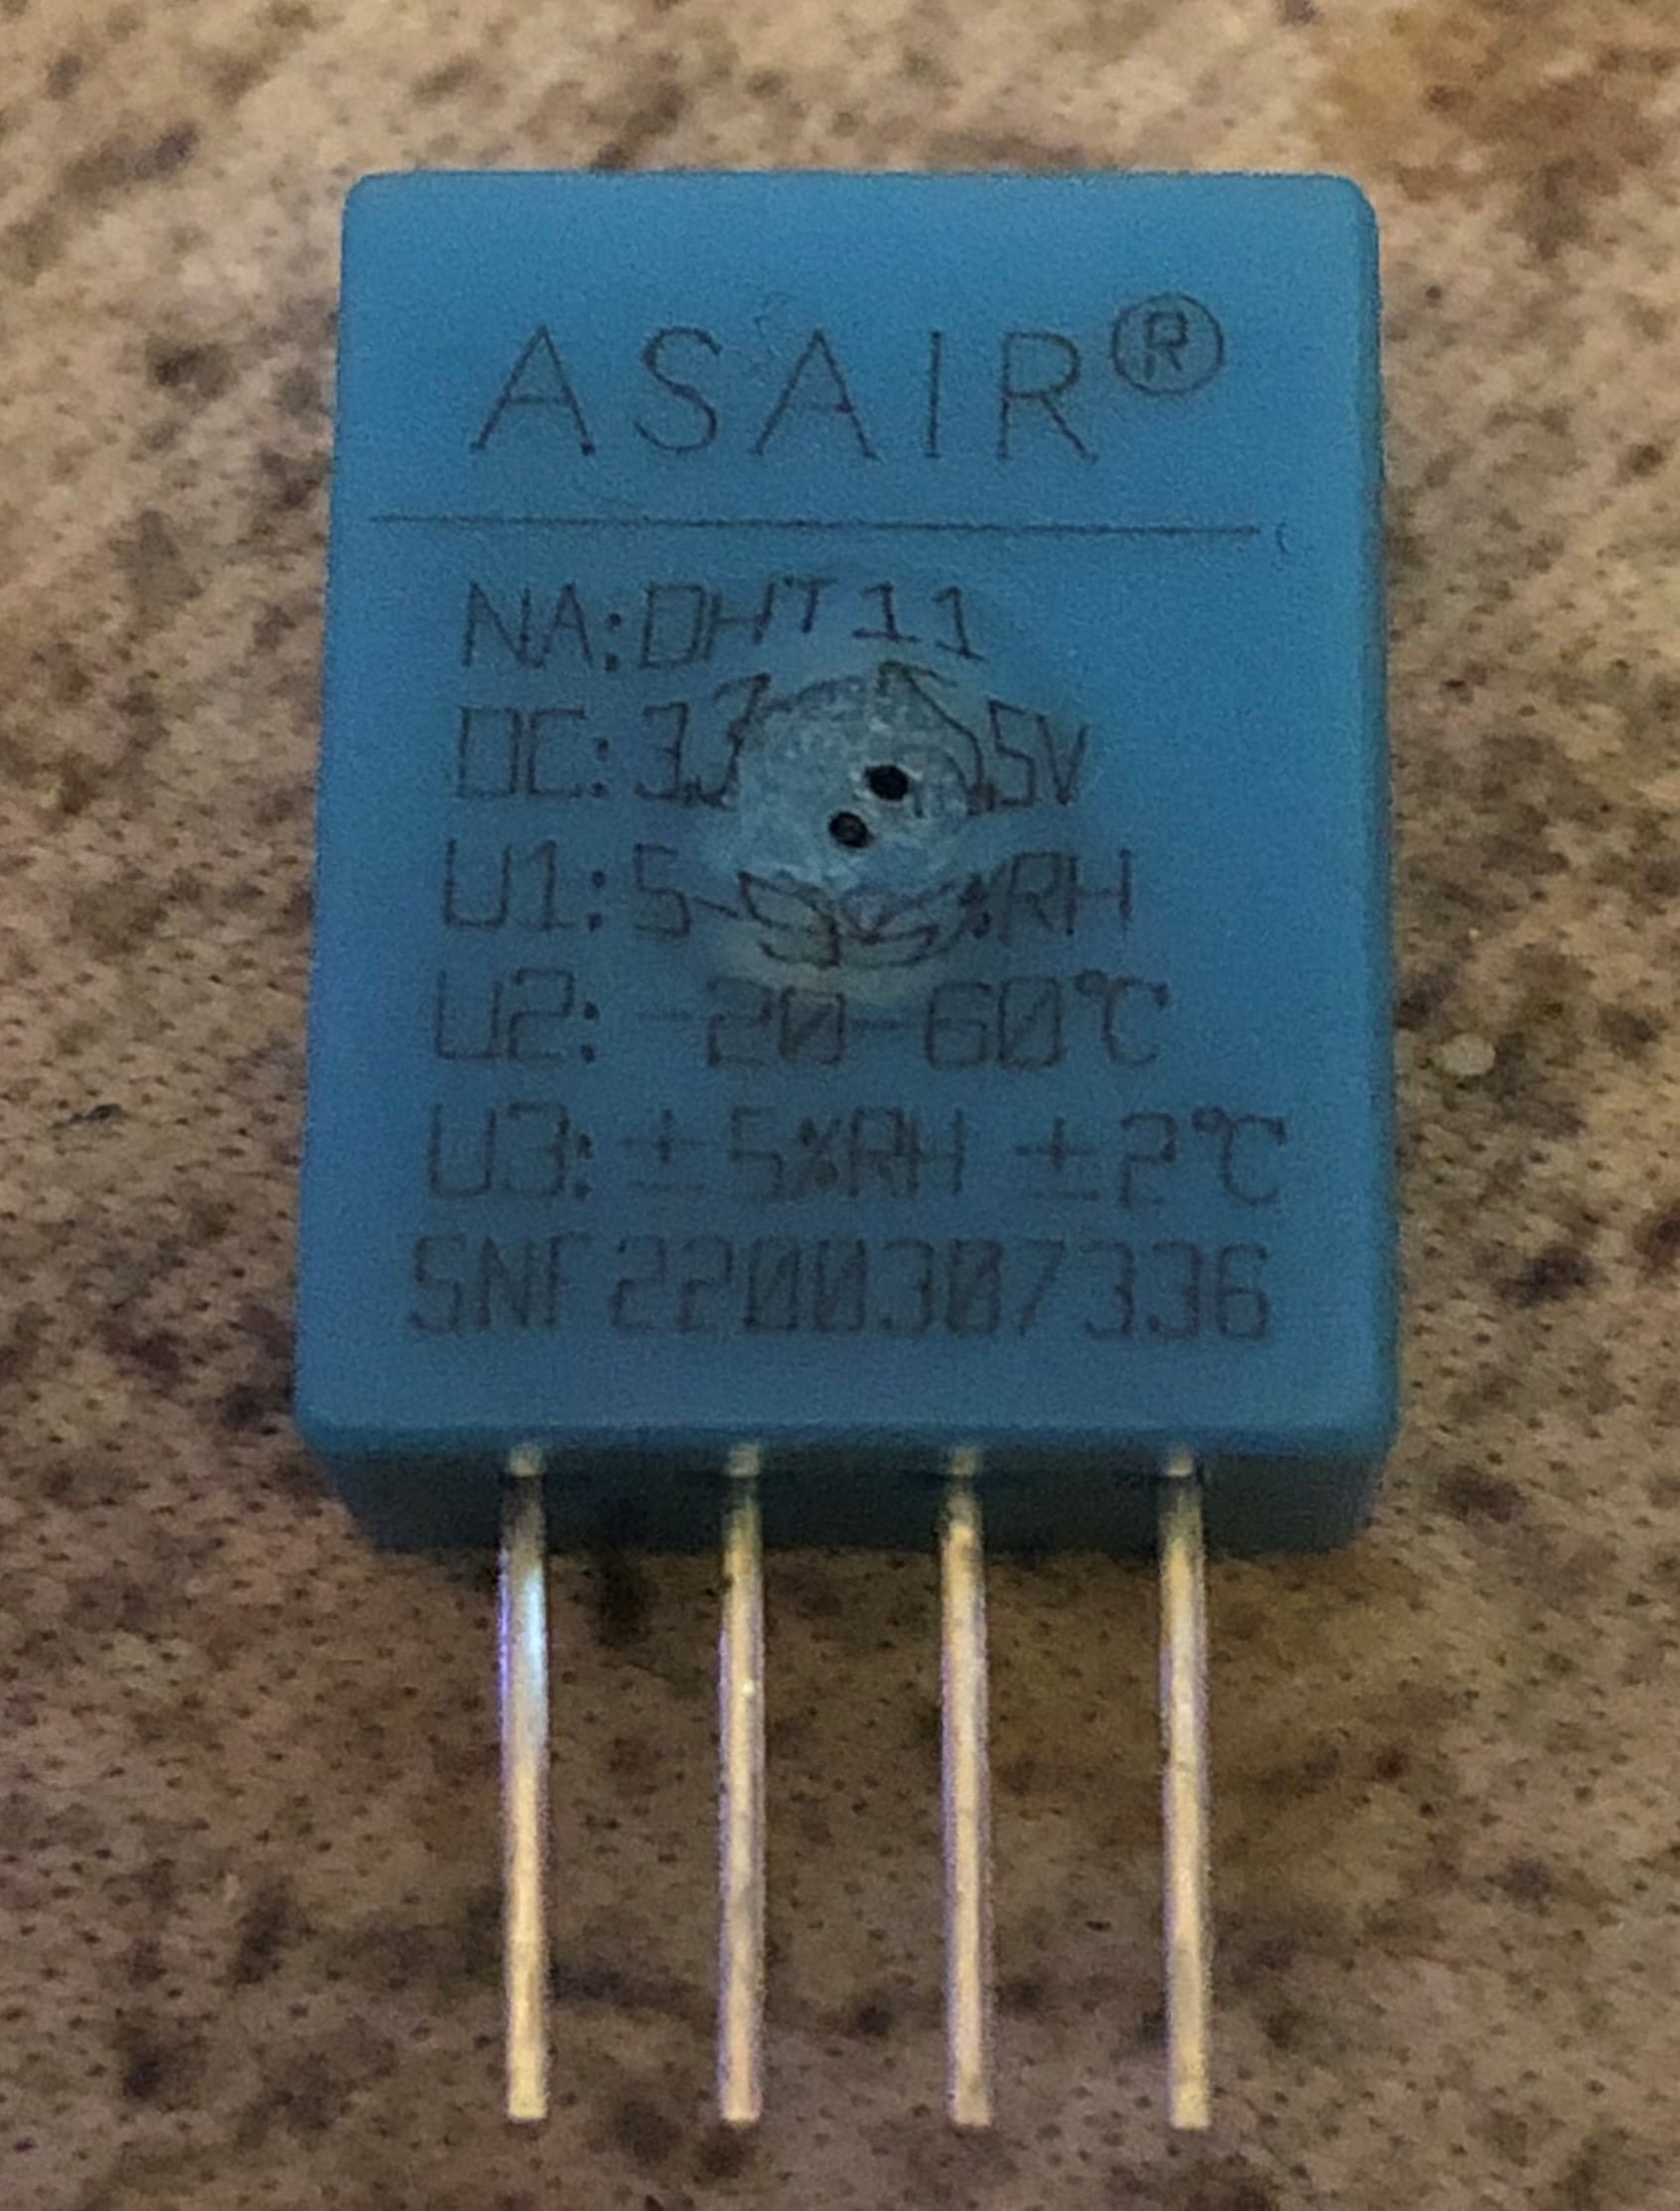
I have had a setback or two. One big one was that I may have burnt out the DHT11 sensor that I was going to use to test the setup. I had just put the wires in on the breadboard and about to put the resistor in, as the DHT11 is only the sensor and not the module. I then smelt burning, I quickly pulled all cables out of the breadboard and the Pico. It was still quite a strong smell, so I started to sniff the Pico and DHT11, it turned out to be that. I didn't realize that I had placed it into the breadboard backwards to my diagram, so I had placed the 3v3 cable into the rail that had the DHT ground pin in, and the ground wire into the rail that contained the DHT VCC pin. So there is a nice burn hole in the back of the sensor now.

Thanks to my slight error, I decided to pick up a DHT22 module, so I don't have to deal with the resistor separately. This will help as my overall plan is to mount and solder it all onto some perf board and then maybe a custom PCB for it all if I get that far.
So then on with what I have done to get it working.
Equipment
So for this project I will be using:
- Raspberry Pi Pico W
- Breadboard
- Jumper cables
- DHT11/22
- IDE (Thonny, Arduino)
- 10kΩ Resistors (if using a DHT sensor and not module)
Raspberry Pi Pico W

I will be using the Pico W for this project as it has built in Wi-Fi, so reduces the costs slightly as I won't need to purchase another module such as a ESP32 Wi-Fi coprocessor like the Adafruit Airlift FeatherWing.
Breadboard

I will be using the breadboard to hold the Raspberry Pi Pico and the DHT22 module. I will be connecting the two together with the cables.
Jumper Cables (DuPont Cables)
 Cables")
There are different styles of cables, some are rigid, sit flush to the breadboard, and are premeasured to different lengths that you may need. Others are like mine that while they are premeasured they don't sit flat to the breadboard but arch over the board.
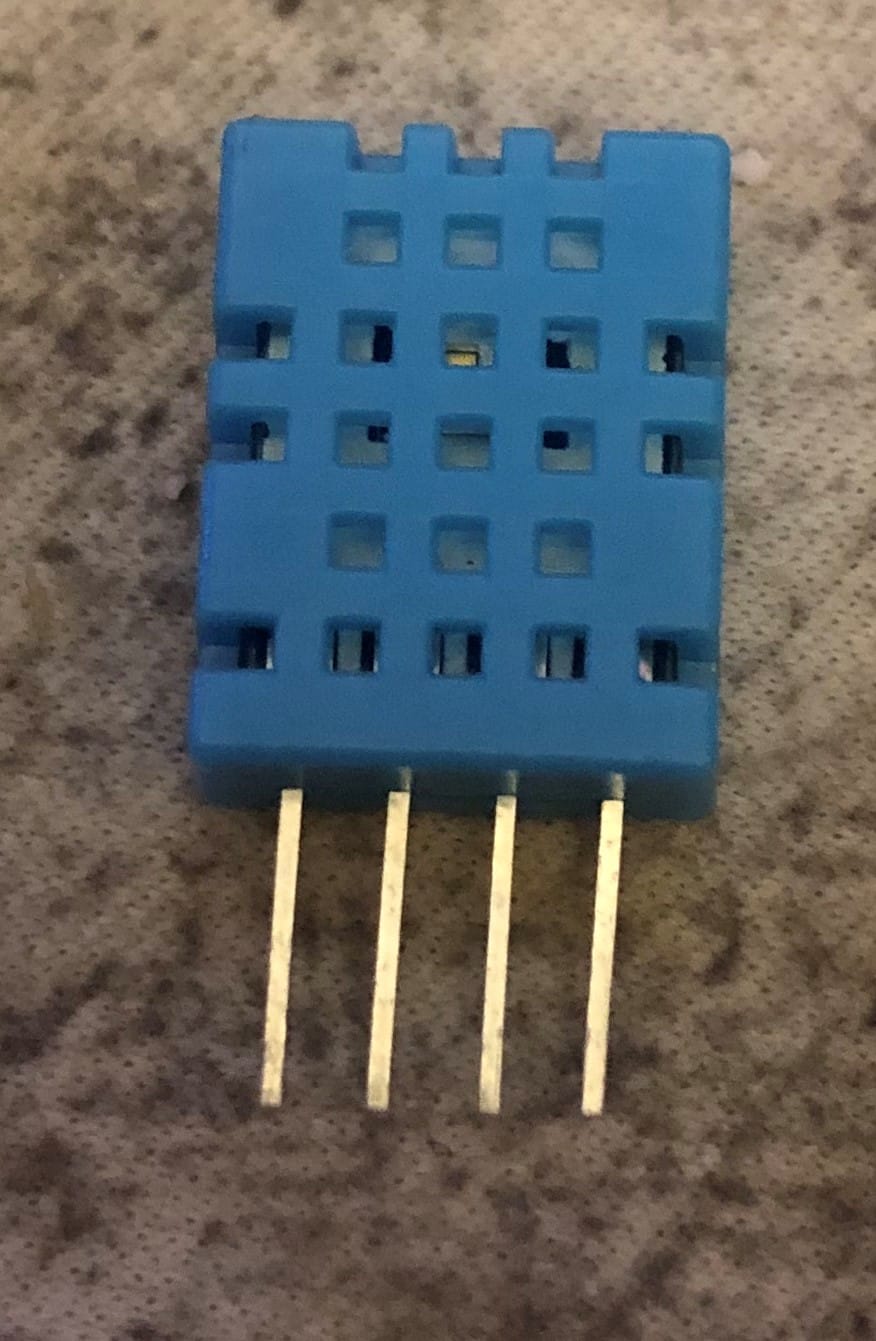
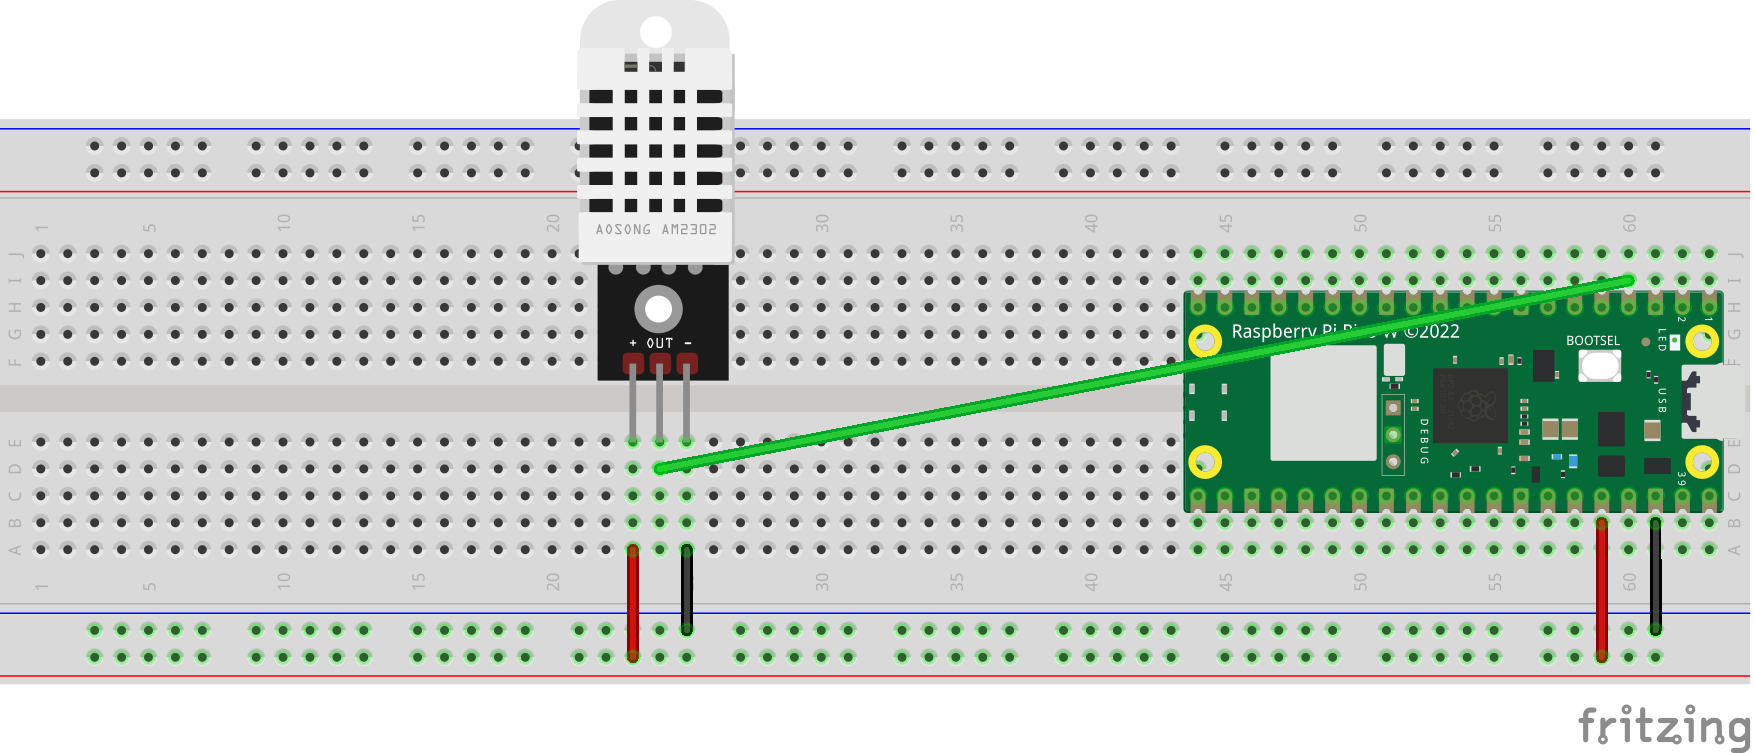
The DHT11 sensor on the left and on the right the DHT22 module
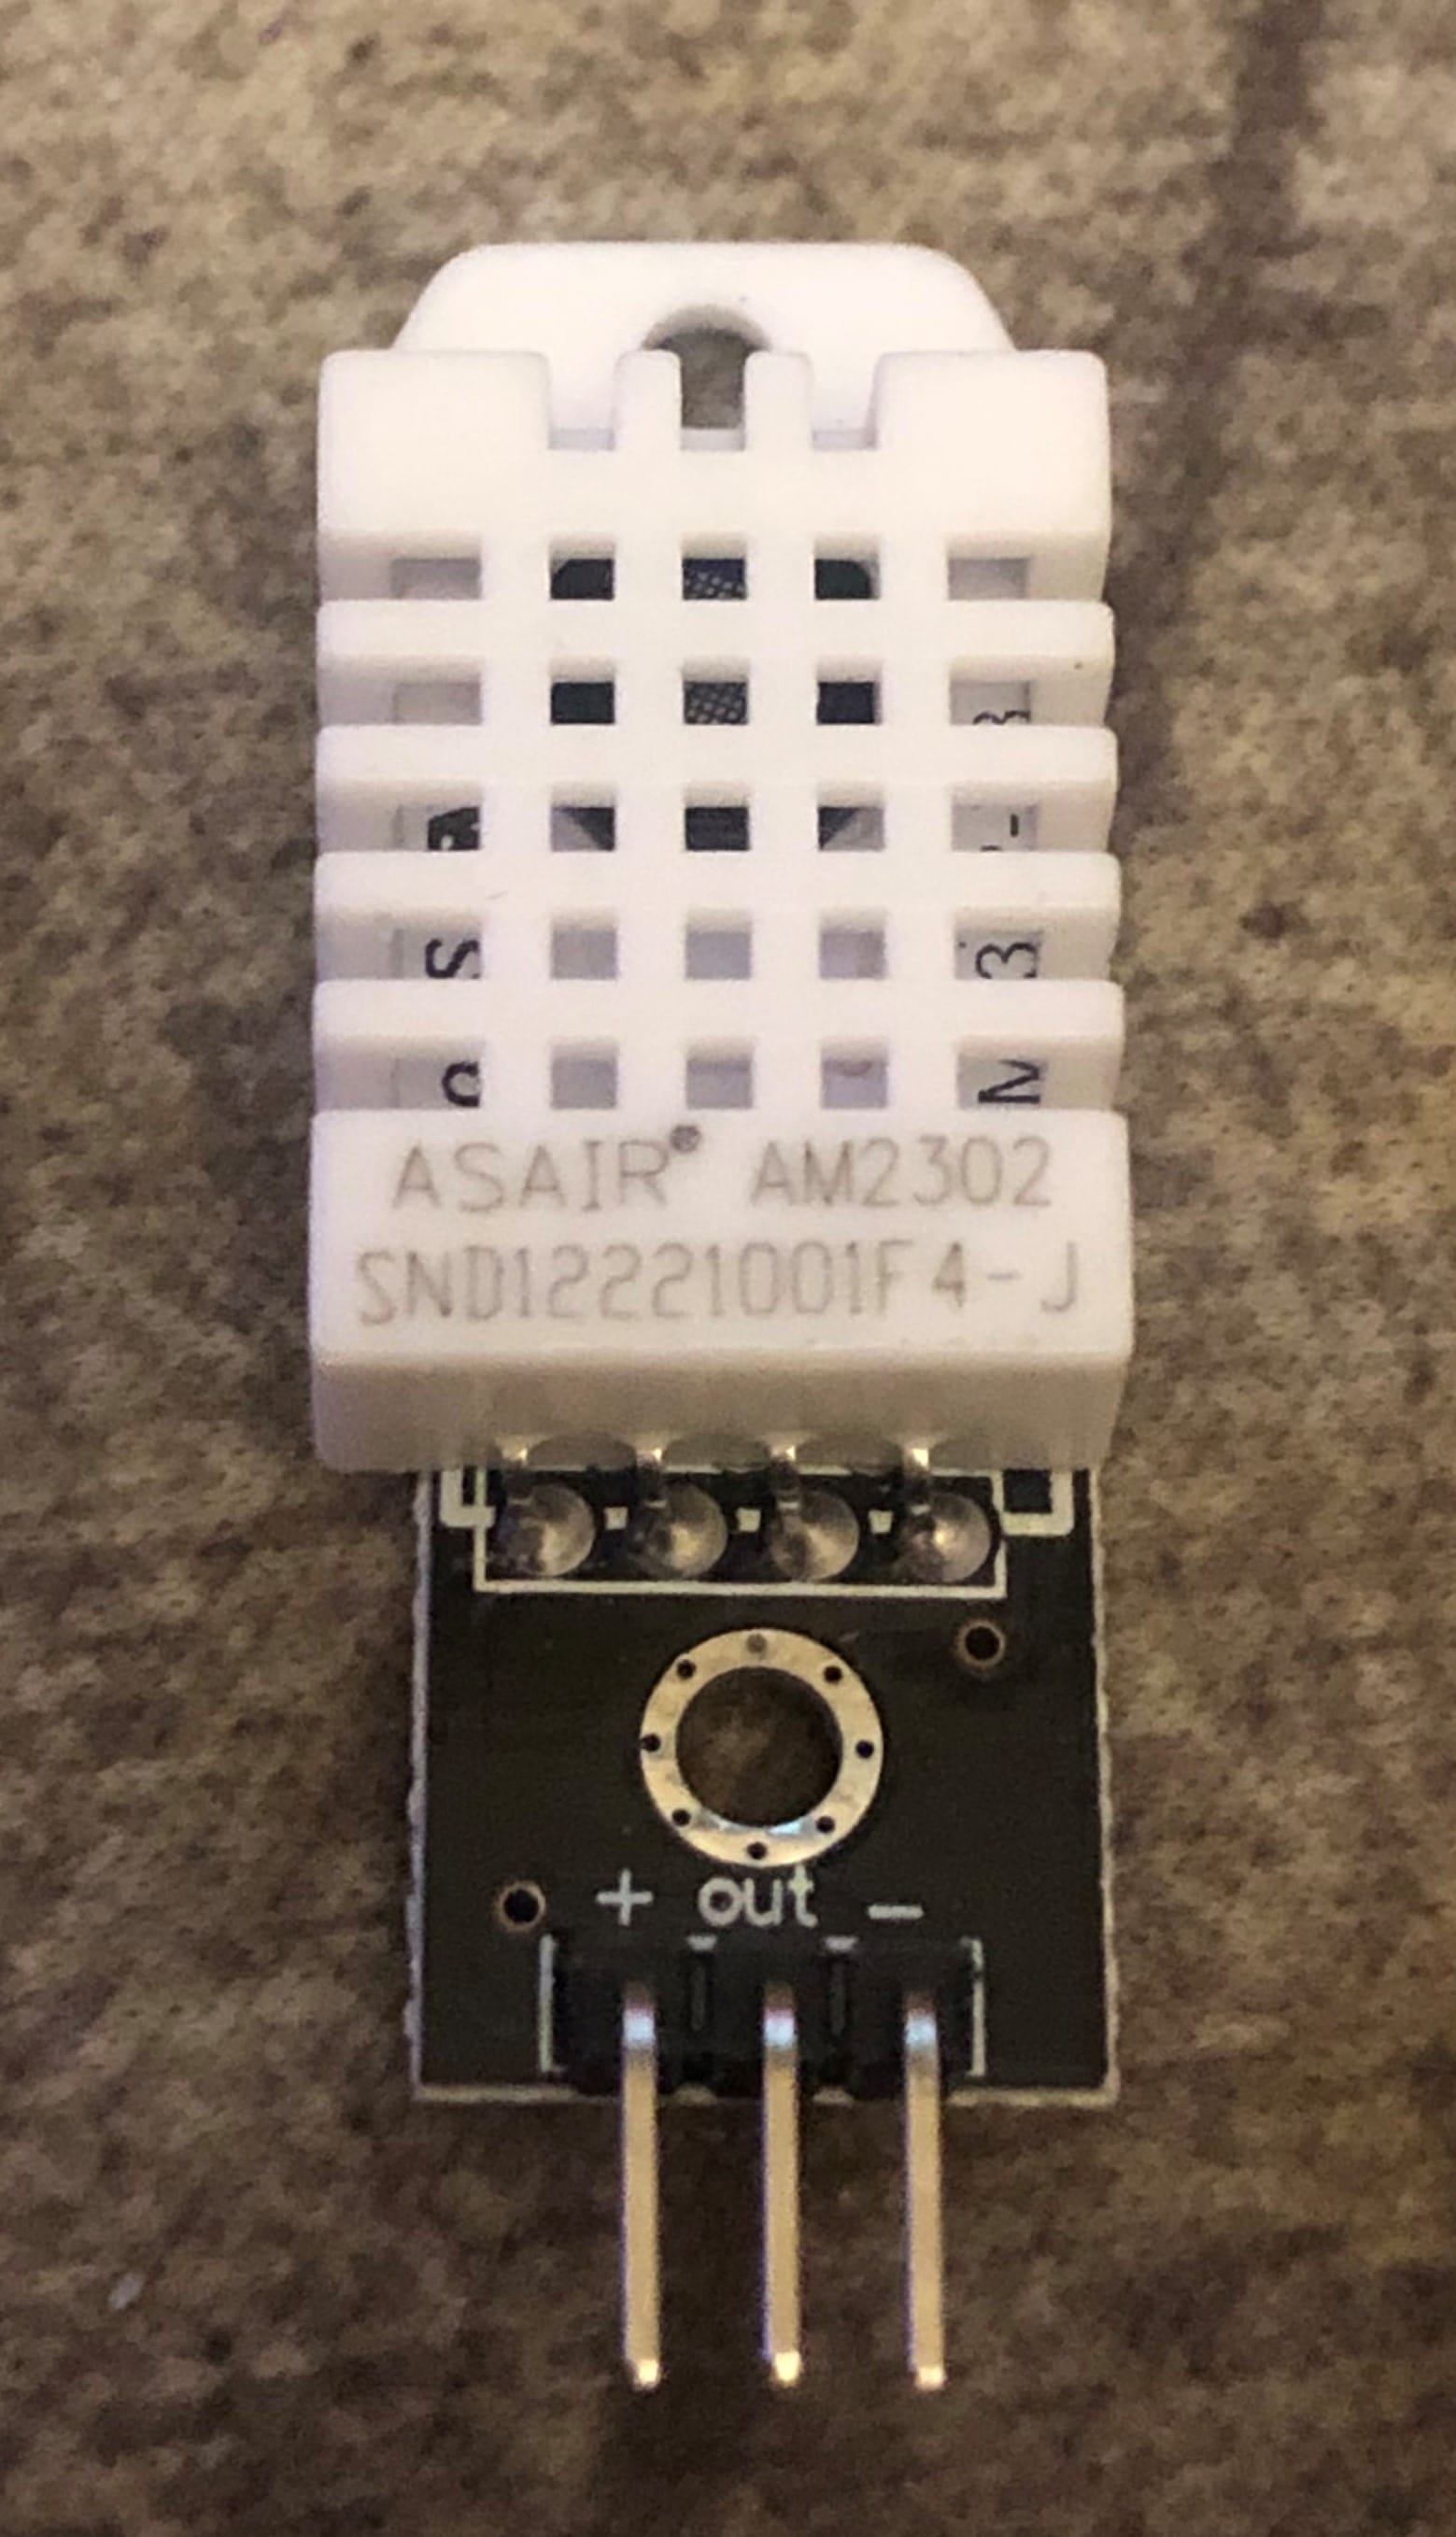
DHT11/DHT22
As I mentioned further up in the post, I was originally going to build this project with a DHT11 sensor, but due to melting a hole in it, I have a DHT22 module which has the sensor and required 10kΩ resistor soldered onto a PCB for ease of use.
The DHT11 and DHT22 are very similar in what they do and how they look
Module Pins
| Pin | Label | Raspberry Pi Pico W |
|---|---|---|
| 1 | VCC+ | 36 3V3(OUT) |
| 2 | OUT | 4 SDA |
| 3 | GND- | 38 GND |
Sensor Pins
| Pin | Label | Raspberry Pi Pico W |
|---|---|---|
| 1 | VCC+ | 36 3V3(OUT) |
| 2 | DATA | 4 SDA |
| 3 | NC | |
| 4 | GND- | 38 GND |
The 10k resistor will need to be placed between pins 1 (VCC) and 2 (DATA).
Thonny IDE
While you could use any Integrated Development Environment (IDE) and then copy the files to the Raspberry Pi Pico W I will be using Thonny as this allows us to connect to the Pico W and save directly to the Pico W, as well as allowing us to search and install any libraries we might need onto the Pico W too.
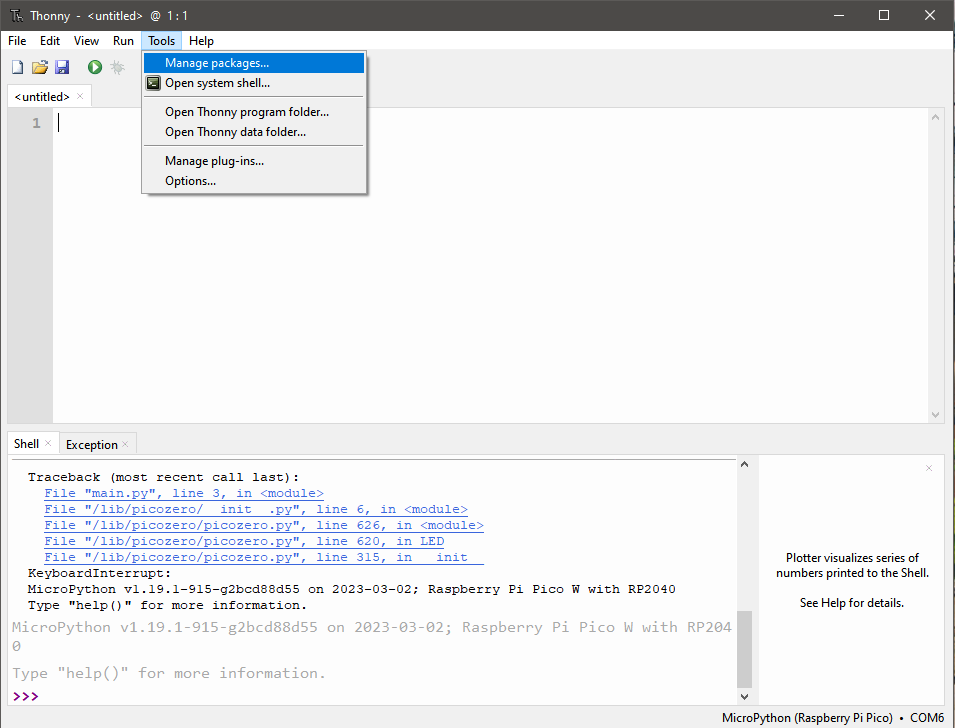
Modules
With in Thonny we can install the library's and packages that we need. In this project I will be needing to install pizozero this will allow me to easily use the onboard LED amongst other things.
To install, I will go to the Tools>Manage packages... in the Thonny toolbar
Then in the box that shows up, I will search for picozero and click on the install button.
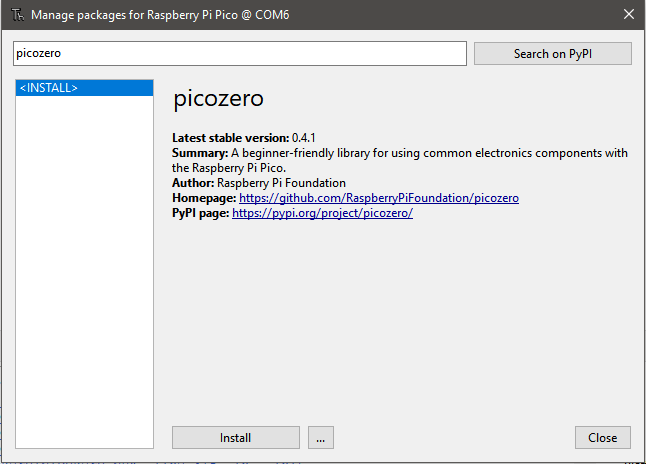
Then to be able to use the library I can just import it in python
import picozeroWiring Diagram
DHT22 Module Diagram
| Wire Colour | DHT22 Module | Raspberry Pi Pico W |
|---|---|---|
| Green | OUT | 4 SDA |
| Red | VCC+ | 36 3V3(OUT) |
| Black | GND- | 38 GND |
DHT Sensor Diagram
| Wire Colour | DHT Sensor | Raspberry Pi Pico W | 10kΩ Resistor |
|---|---|---|---|
| Red | VCC+ | 36 3V3(OUT) | |
| Green | DATA | 4 SDA | |
| Black | GND- | 38 GND | |
| Blue | DATA | Right | |
| Blue | VCC+ | Left |
Measuring Temperature, Humidity, and Pressure
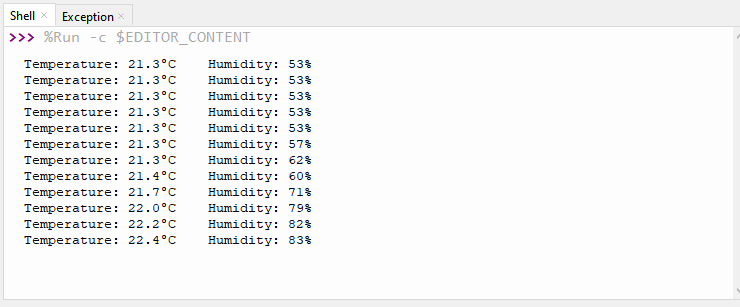
To get a reading for the temperature and humidity from the sensor I will need to import the library's, I will also have the LED on the Pico flash every time a reading is taken.
First the library's to be imported are
from machine import Pin
from time import sleep
from picozero import pico_let, LED
import dht
I'll then create the variable for the DHT22
sensor = dht.DHT22(Pin(2))Then I will use while True to create an infinite loop that waits for two seconds before starting again. Within the loop, I will create two more variables, one for the temperature and one for the humidity.
while True:
  pico_sensor.on()
  sensor.measure()
  temp = sensor.temperature()
  hum = sensor.humidity()
  print('Temperature: {}C Humidity:{:.of}%'.format(temp,hum))
  pico_led.off()
  sleep(2)
The output of the script is
Connecting to Wi-Fi
For both this section and the next, I will be using the tutorial available from the Raspberry Pi Foundation called Getting started with your Raspberry Pi Pico W.
First, I will import the required library's.
import network
import machine
from time import sleep
Then I will create the variables for the routers SSID and password.
ssid = 'YOUR WiFi NAME HERE'
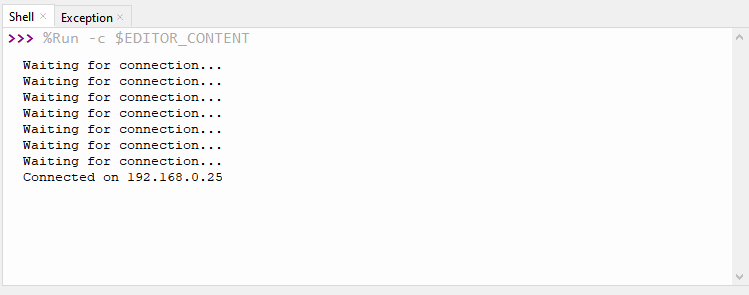
password = 'YOUR WiFi PASSWORD HERE' Then I will create a function to connect to the WLAN, loop every second until it is connected and then print out the IP address of the Raspberry Pi Pico W. At the end I will place a try/except to reset the Raspberry Pi Pico W as the Wi-Fi connection will stay active even after the code is stopped. This will also contain a variable to store the returned IP address
def connect():
    #connect to WiFi Network
    wlan = network.WLAN(network.STA_IF)
    wlan.active(True)
    wlan.connect(ssid, password)
    #Loop until connected
    while wlan.isconnected() == False:
        print('Witing for connection...')
        sleep(1)
    #Get just IP address
    ip = wlan.ifconfig()[0]
    #Print out IP address
    print(f'Connected on {ip}')
    return ip

#Reset machine to sever WiFi connection
try:
    ip = connect()
except KeyboardInterrupt:
    machine.reset()
When I start the script, I should get the following output
Adding Web server and HTML
While still following the tutorial from the previous section, I will now have to create a function above the try/except to open the HTTP socket 80 and have it listen for requests to allow web connections.
def open_socket(ip):
    address = (ip, 80)
    connection = socket.socket()
    connection.bind(address)
    connection.listen(1)
    return connection
Just below this I will create a function named webpage that contains two parameters, these will be the temp and hum from the readings we took previously. This function will then create a webpage that contains a table that will display the temperature and humidity in a nice format. This table and formatting came from a similar project that I found on Instructables called 'Make a Simple Raspberry Pi Pico W Weather Station' that has since been removed, sadly.
def webpage(temp, hum):
    html = """<html>
              <head>
              <meta http-equiv="refresh" content="5">
              <meta name="viewport" content="width=device-width, initial-scale=1">
              <link rel="icon" href="data:,">
              <style>
              body { text-align: center; font-family: "Helvetica", Arial;}
              table { border-collapse: collapse; width:55%; margin-left:auto; margin-right:auto; }
              th { padding: 12px; background-color: #87034F; color: white; }
              tr { border: 2px solid #000556; padding: 12px; }
              tr:hover { background-color: #bcbcbc; }
              td { border: none; padding: 14px; }
              .sensor { color:DarkBlue; font-weight: bold; background-color: #ffffff; padding: 1px;
              </style>
              </head>
              <body>
              <h1>BME280 Pi Pico W Weather Station</h1>
              <table><tr><th>Parameters</th><th>Value</th></tr>
              <tr><td>Temperature</td><td><span class="sensor">""" + "{}C".format(temp) + """</span></td></tr>
              <tr><td>Humidity</td><td><span class="sensor">""" + "{:.02f}%".format(hum) + """</span></td></tr>
              </html>"""
    return html
Below the webpage function I will create a new function called serve that has the parameter connection this function will contain the temperature, humidity, and sensor variables that were created earlier as well as the size of the data chunks that the web browser is served (which will be in 1024 bytes) and it will send the HTML to the client.
def serve(connection):
    sensor = dht.DHT22(Pin(2))
    while True:
        client = connection.accept()[0]
        request = client.recv(1024)
        request = str(request)
        try:
            request = request.split()[1]
        except IndexError:
            pass
        pico_led.on()
        sensor.measure()
        temp = sensor.temperature()
        hum = sensor.humidity()
        pico_led.off()
        sleep(2)
        html = webpage(temp, hum)
        client.send(html)
        client.close()
I will then add a variable connection and serve function to the try/except to store the returned connection and to serve the webpage and content. The try/except should now look like this.
try:
    ip = connect()
    connection = open_socket(ip)
    serve(connection)
except KeyboardInterrupt:
    machine.reset()
Conclusion
The final file should look something like this:
import machine
from machine import Pin
from picozero import pico_led, LED
from time import sleep
import network
import socket
import dht

ssid = 'YOUR WiFi NAME HERE'
password = 'YOUR WiFi PASSWORD HERE'

def connect():
    #connect to WLAN
    wlan = network.WLAN(network.STA_IF)
    wlan.active(True)
    wlan.connect(ssid, password)
    while wlan.isconnected() == False:
        print('Waiting for connection...')
        sleep(1)
    ip = wlan.ifconfig()[0]
    print(f'Connected on {ip}')
    return ip


def open_socket(ip):
    # open a socket
    address = (ip, 80)
    connection = socket.socket()
    connection.bind(address)
    connection.listen(1)
    return connection

def webpage(temp, hum):
    html = """<html>
              <head>
              <meta http-equiv="refresh" content="5">
              <meta name="viewport" content="width=device-width, initial-scale=1">
              <link rel="icon" href="data:,">
              <style>
              body { text-align: center; font-family: "Helvetica", Arial;}
              table { border-collapse: collapse; width:55%; margin-left:auto; margin-right:auto; }
              th { padding: 12px; background-color: #87034F; color: white; }
              tr { border: 2px solid #000556; padding: 12px; }
              tr:hover { background-color: #bcbcbc; }
              td { border: none; padding: 14px; }
              .sensor { color:DarkBlue; font-weight: bold; background-color: #ffffff; padding: 1px;
              </style>
              </head>
              <body>
              <h1>BME280 Pi Pico W Weather Station</h1>
              <table><tr><th>Parameters</th><th>Value</th></tr>
              <tr><td>Temperature</td><td><span class="sensor">""" + "{}C".format(temp) + """</span></td></tr>
              <tr><td>Humidity</td><td><span class="sensor">""" + "{:.02f}%".format(hum) + """</span></td></tr>
              </html>"""
    return html

def serve(connection):
    sensor = dht.DHT22(Pin(2))
    while True:
        client = connection.accept()[0]
        request = client.recv(1024)
        request = str(request)
        try:
            request = request.split()[1]
        except IndexError:
            pass
        pico_led.on()
        sensor.measure()
        temp = sensor.temperature()
        hum = sensor.humidity()
        pico_led.off()
        sleep(2)
        html = webpage(temp, hum)
        client.send(html)
        client.close()

try:
    ip = connect()
    connection = open_socket(ip)
    serve(connection)
except KeyboardInterrupt:
    machine.reset()
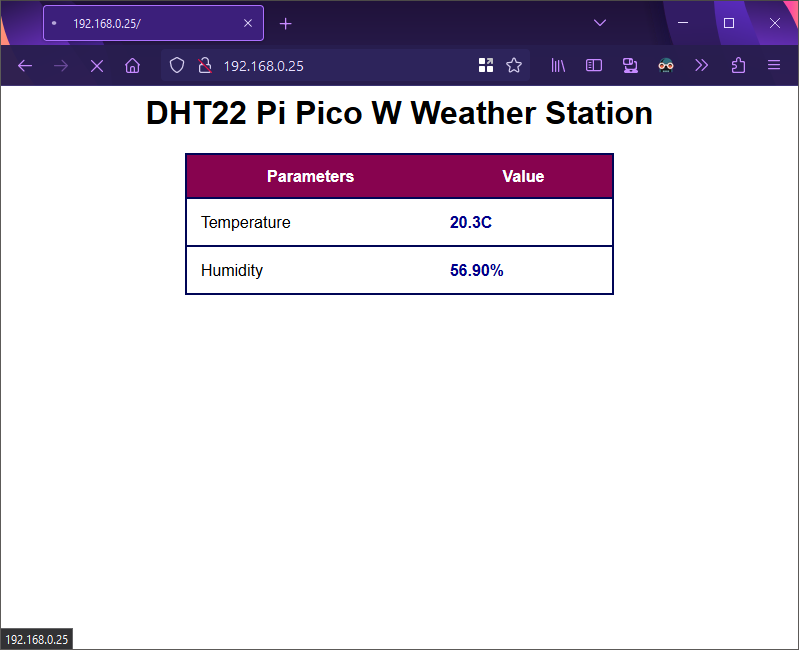
The output in the web browser will look like this
If you would like the Pico W to take readings when it is not connected to the computer the file needs to be called main.py as this is the file that is looked for when the Pico boots.
While this does look nice and serves the readings from the DHT22 very well. It only shows the current readings, so I would like to have some past readings being visible. I may even change it from serving a web page with the readings to having a MQTT client that can then be input into something like Grafana along with the air quality monitor hat I have, so I can see the temperature, humidity and air quality on a nice dashboard.